Great to see more Revit blogs hitting the net !
The latest one I've seen is Jay Poldings " Revit - In Plain English ".
Check it out.
Friday, January 27, 2006
Thursday, January 05, 2006
Take a Shortcut.
When I'm traveling around the country talking and demonstrating Revit in different organizations, I'm often asked how I instigated a particular task in Revit without using the toolbars.
The answer is Shortcut Keys. ( Revit calls them Keyboard accelerators ).
They have become second nature in my work and I'm sure they will help you to be faster and more productive as well.
You can use the shortcut keys for a wide range of common tasks such as zooming, changing view properties, and adding common elements such as walls.
The shortcut file - KeyboardShortcuts.txt is normally found in C:\Program Files\Autodesk Revit Building\Program\. The path may vary depending on your operating system or where you installed Revit Building.
A portion of the file loks like this :-
 Out of the box, Revit has about 95 shortcuts pre-defined.
Some of the commonly used shortcut keys are :-
MV Menu Edit > Move
PR Menu Edit > Properties.
DR Menu Edit > Door.
WA Menu Edit > Wall.
WN Menu Edit > Window.
F8 Menu View > Dynamically Modify View.
VV Menu View > Visibility Graphics ( I prefer this to VG, but both work )
VP Menu View > View Properties.
ZF Menu View > Zoom > Zoom to Fit.
ZO Menu View > Zoom > Zoom Out ( 2x ).
ZR Menu View > Zoom Zoom in Region.
SI Snapcode Intersections.
SO Snapcode Snaps Off.
Other useful shortcuts are :-
CTRL ( key ) Selects Multiple elements.
TAB (key ) Cycle through highlighted elements to select those that are close to one another.
TAB (key ) Highlight wall faces or centrelines when placing dimensions.
TAB (key ) Cycle through different snaps while creating walls and lines, placing elements, or moving and pasting elements.
You can customise your own shortcuts for menu commands.
You can create multiple shortcuts for one menu command.
In the menu, the shortcut displayed is the first shortcut listed in the KeyboardShortcuts.txt file. All other shortcuts will work. Shortcuts are only available when their corresponding menu item is available.
Once created, these shortcuts appear next to their corresponding menu item.
Customizing the accelerators requires you to open KeyboardShortcuts.txt.
Locate the file KeyboardShortcuts.txt.
Open the file in a text editor.
At the top of the file you will see several paragraphs with each line preceded by a semi-colon. A list of commands begins after the text. Command lines are not preceded with semi-colons.
Command syntax is as follows:
"key(s)" menu:"menu-string"
Fkey menu:"menu-string
For example, in the following command line, "M" will launch the menu command, Edit, Move.
"M" menu:"edit-move"
You can also use F2-F12 keys as keyboard accelerators. These command lines do not surround the shortcut key in quotes. For example, in the following command line, notice that the shortcut key F5 has no quotes. F5 will launch the menu command, View, Refresh.
F5 menu:"view-refresh"
Insert a new line between any two existing commands.
Type the new command using the examples above.
Save and close the file.
Restart Revit Building to see the changes.
The file KeyboardShortcuts.log contains any errors encountered while reading this file.
Monday, January 02, 2006
The Key to Schedules.
When you create a schedule in Revit, you will have seen that you can choose "schedule building components "or "schedule keys ".
 A key schedule lists styles that you can predefine for use in the schedule; this makes it easy to automatically fill in fields in the schedule, rather than enter them every time by hand.
Say you have a large door schedule, for instance, with many different configurations of hardware. There may be some "hardware types "which apply to many of the doors. This is an ideal situation to use the power of a key schedule.
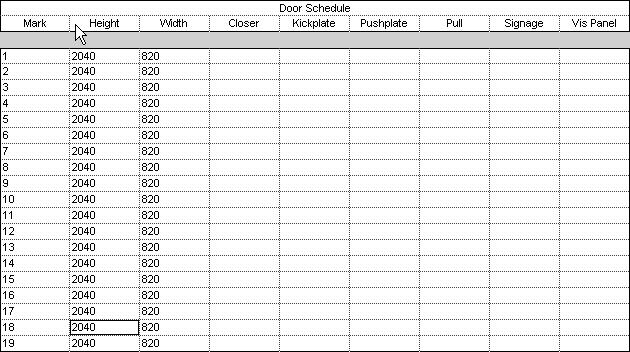
Firstly, create a door schedule by component in the normal way. Add the fields for the different hardware elements. In this case, I'm formating these fields as text fields, so that I can use a matrix for my schedule.
 At this stage, the component schedule looks like this.
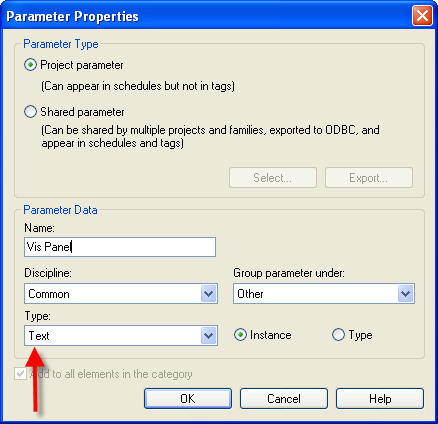
Now create you key schedule. Note that the Schedule name was changed to Door Hardware Schedule and the key name was changed to hardware. When you OK this dialogue, the key schedule properties dialogue box appears. It looks exactly like a component schedule, except that the first default field is Key Name .
Select the relevant fields for the different styles that you want to apply to the component schedule. ( I've moved the Key Name field to the bottom of the list. )
 When you OK this dialogue, Revit creates the Key Schedule. It looks very unimposing at this point.

You need to select the Rows > New button in the Options Bar to create a new row. This row will automatically use the key name default number 1. You can change this to any alphanumeric text.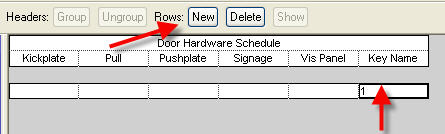 Now you can add symbols to these fields to represent "yes" and leave them blank for "no ".
If you aren't sure how to do this, refer to Steve Stafford's OpEd Blog - Are You A Special Character.
Proceed in this manner to create the styles for you door hardware.
The key schedule now looks like this.
 Now return to the Door component Schedule.
Under the Fields tab, a new fields is available - "Hardware ". This is the keyname mentioned earlier.
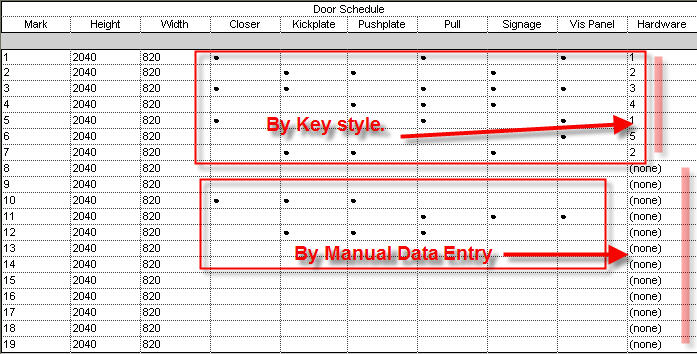
Add this field to your schedule and use it to populate the rows with the styles applicable to each door.
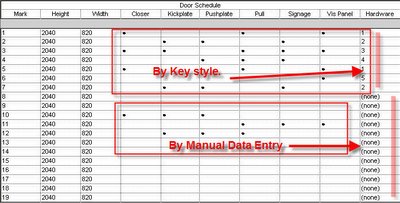
Note that you can use "none"for the keyname field and enter data manually.
also note that if you use the keyname styles, then you cannot directly modify the fields. In this case, you modify the Key Schedule, by changing the data , this will in turn modify all instances of that style appearing in your component schedule.
A very powerful tool to deal accurately and quickly with a large amount of data !
The completed door schedule looks like this.
( For the final schedule, you would probably hide the Key Name, ie Hardware " column and possibly , use a vertical format for the titles in the hardware columns. )
Subscribe to:
Posts (Atom)
