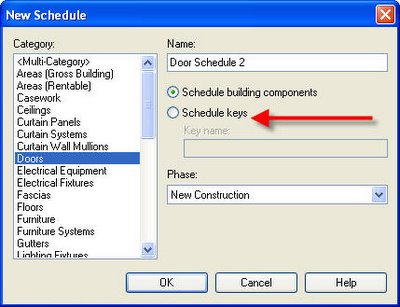
 A key schedule lists styles that you can predefine for use in the schedule; this makes it easy to automatically fill in fields in the schedule, rather than enter them every time by hand.
Say you have a large door schedule, for instance, with many different configurations of hardware. There may be some "hardware types "which apply to many of the doors. This is an ideal situation to use the power of a key schedule.
Firstly, create a door schedule by component in the normal way. Add the fields for the different hardware elements. In this case, I'm formating these fields as text fields, so that I can use a matrix for my schedule.
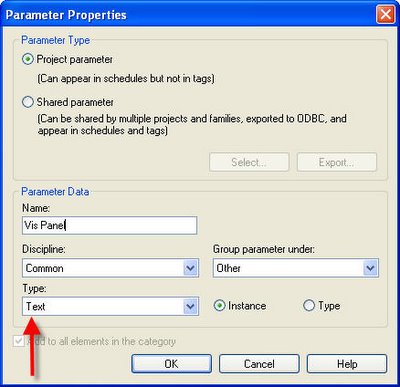 At this stage, the component schedule looks like this.

Now create you key schedule. Note that the Schedule name was changed to Door Hardware Schedule and the key name was changed to hardware.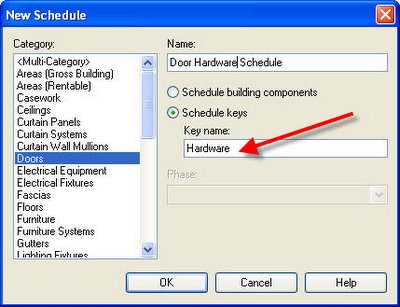 When you OK this dialogue, the key schedule properties dialogue box appears. It looks exactly like a component schedule, except that the first default field is Key Name .
Select the relevant fields for the different styles that you want to apply to the component schedule. ( I've moved the Key Name field to the bottom of the list. )
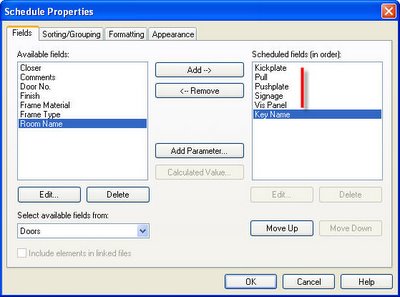 When you OK this dialogue, Revit creates the Key Schedule. It looks very unimposing at this point.

You need to select the Rows > New button in the Options Bar to create a new row. This row will automatically use the key name default number 1. You can change this to any alphanumeric text. Now you can add symbols to these fields to represent "yes" and leave them blank for "no ".
If you aren't sure how to do this, refer to Steve Stafford's OpEd Blog - Are You A Special Character.
Proceed in this manner to create the styles for you door hardware.
The key schedule now looks like this.
 Now return to the Door component Schedule.
Under the Fields tab, a new fields is available - "Hardware ". This is the keyname mentioned earlier.
Add this field to your schedule and use it to populate the rows with the styles applicable to each door.
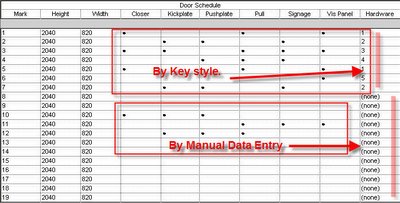
Note that you can use "none"for the keyname field and enter data manually.
also note that if you use the keyname styles, then you cannot directly modify the fields. In this case, you modify the Key Schedule, by changing the data , this will in turn modify all instances of that style appearing in your component schedule.
A very powerful tool to deal accurately and quickly with a large amount of data !
The completed door schedule looks like this.
( For the final schedule, you would probably hide the Key Name, ie Hardware " column and possibly , use a vertical format for the titles in the hardware columns. )

4 comments:
Great tutorial Bruce.
For days I'm trying to figure out how to create a hardware schedule (integral with door or separate)which lists quantity of hardware items, their manufacturer, product number, finish, etc. Any thoughts on that?
Thanks Bruce. An simple and efficient explanation. I will implement it now.
This is a very helpful tutorial--but how can I get a calculated value into a custom room tag? i.e., I have shared parameters loaded into my project for Occupant Load and SF/Occupant for use in a life safety room tag; however I don't see a way to get a calculated value for occupant load into a tag.
Have you done any work on this?
Hi P Doele,
It can be done with a little work.
The problem is that a calculated value, such as Occupant Load cannot be used in a tag, since that value does not exist until the tag is placed in a project.
The workaround, is to create a shared parameter for the OL Tag, then manually enter that value in a schedule by referring to the adjacent automatically calculated value in the schedule. The shared parameter can be tagged. A check column, in the schedule is useful, to make sure that the tag values are always up to date.
Not very Revit-like, is it ?, ... but it works.
Post a Comment