The answer is Shortcut Keys. ( Revit calls them Keyboard accelerators ).
They have become second nature in my work and I'm sure they will help you to be faster and more productive as well.
You can use the shortcut keys for a wide range of common tasks such as zooming, changing view properties, and adding common elements such as walls.
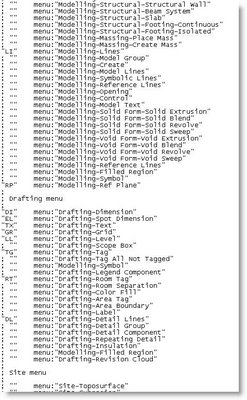
The shortcut file - KeyboardShortcuts.txt is normally found in C:\Program Files\Autodesk Revit Building\Program\. The path may vary depending on your operating system or where you installed Revit Building.
A portion of the file loks like this :-
 Out of the box, Revit has about 95 shortcuts pre-defined.
Some of the commonly used shortcut keys are :-
MV Menu Edit > Move
PR Menu Edit > Properties.
DR Menu Edit > Door.
WA Menu Edit > Wall.
WN Menu Edit > Window.
F8 Menu View > Dynamically Modify View.
VV Menu View > Visibility Graphics ( I prefer this to VG, but both work )
VP Menu View > View Properties.
ZF Menu View > Zoom > Zoom to Fit.
ZO Menu View > Zoom > Zoom Out ( 2x ).
ZR Menu View > Zoom Zoom in Region.
SI Snapcode Intersections.
SO Snapcode Snaps Off.
Other useful shortcuts are :-
CTRL ( key ) Selects Multiple elements.
TAB (key ) Cycle through highlighted elements to select those that are close to one another.
TAB (key ) Highlight wall faces or centrelines when placing dimensions.
TAB (key ) Cycle through different snaps while creating walls and lines, placing elements, or moving and pasting elements.
You can customise your own shortcuts for menu commands.
You can create multiple shortcuts for one menu command.
In the menu, the shortcut displayed is the first shortcut listed in the KeyboardShortcuts.txt file. All other shortcuts will work. Shortcuts are only available when their corresponding menu item is available.
Once created, these shortcuts appear next to their corresponding menu item.
Customizing the accelerators requires you to open KeyboardShortcuts.txt.
Locate the file KeyboardShortcuts.txt.
Open the file in a text editor.
At the top of the file you will see several paragraphs with each line preceded by a semi-colon. A list of commands begins after the text. Command lines are not preceded with semi-colons.
Command syntax is as follows:
"key(s)" menu:"menu-string"
Fkey menu:"menu-string
For example, in the following command line, "M" will launch the menu command, Edit, Move.
"M" menu:"edit-move"
You can also use F2-F12 keys as keyboard accelerators. These command lines do not surround the shortcut key in quotes. For example, in the following command line, notice that the shortcut key F5 has no quotes. F5 will launch the menu command, View, Refresh.
F5 menu:"view-refresh"
Insert a new line between any two existing commands.
Type the new command using the examples above.
Save and close the file.
Restart Revit Building to see the changes.
The file KeyboardShortcuts.log contains any errors encountered while reading this file.

1 comment:
I can relate to your experience!
I've taken to using the default keyboard shortcuts for basic classes just because of this question. I find that students were glad to learn of the feature but sometimes "jealous" about not having them too...
So I work with the same install that they use and just point out that they can modify them. Advanced classes take it a little farther so I can get to use mine too!
Nice work on the blog, great articles!
Post a Comment