If there's a bustle in your hedgerow don't be alarmed now,
It's just a spring clean for the May queen.
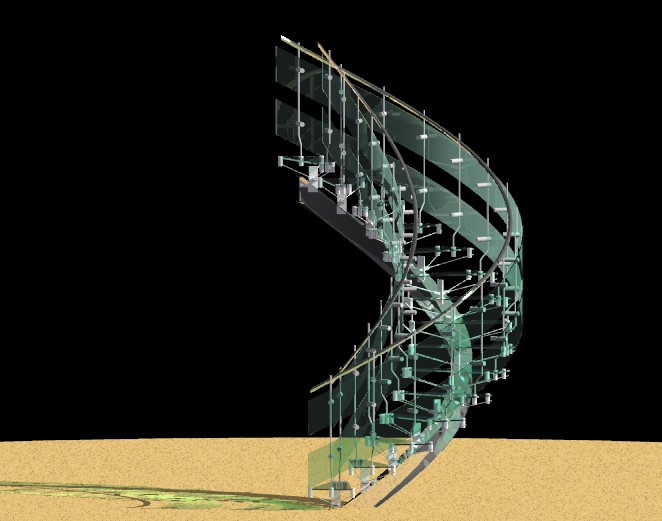
Oops, sorry, wrong blog ! We're talking here about making customised stairs in Revit.
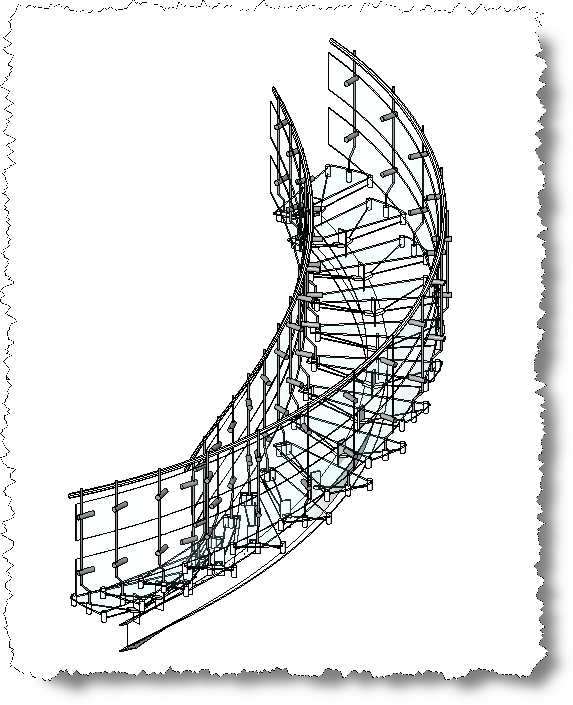
Something like the one pictured above.
Revit makes stairs very quickly and very easily as we all know, but how do we make a rather more complicated stair like this one ?
You would imagine that we could create a custom profile for the stringer maybe ? Well, no, unfortunately we can’t, but even if we could, it wouldn't help with the special tension members that support the glass treads in this example.
What we need in this case is actually to misuse the railing families.!
Within the Railings Type properties, is a setting to place balusters per tread for a stair. This is the secret to creating a custom stair. The baluster family actually defines the complex geometry of the tread support system system.
Lets run through the process :-
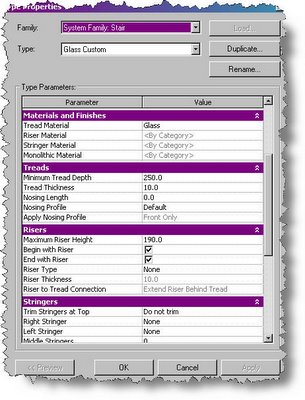
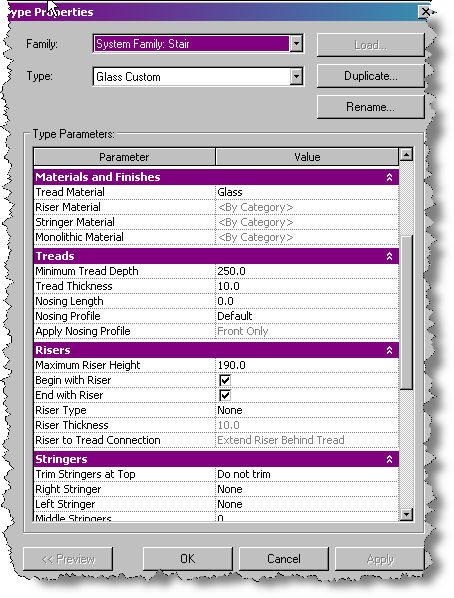
Select the 250 mm going 190 mm riser standard and create a new type called Glass Custom using Edit Duplicate.
Set the width to 1000 mm, In the Type properties, set Tread material to Glass, Tread thickness to 10 mm, Riser Type to none and Right and Left Stringers to none. Then set the Railings to None in the design Bar Sketch Properties.
Draw the stair as an arc with a radius of 1000 mm, Your stair looks something like this.

A promising start, but there's higher to climb yet.
Now we need to create the railing family that we will use for the central support stringer and the tension members for the glass treads.
The first step is to create a profile for the central support beam. This is a simple I beam profile set 300 mm below the insertion point. ( 300 mm works - trust me ! )

Next, we make the baluster that consists of a vertical rod with 2 fixing lugs for the side glass panels, We won't spend time describing the process, its just a vertical sweep with 2 horizontal extrusions.

Name the baluster and load it into your library.
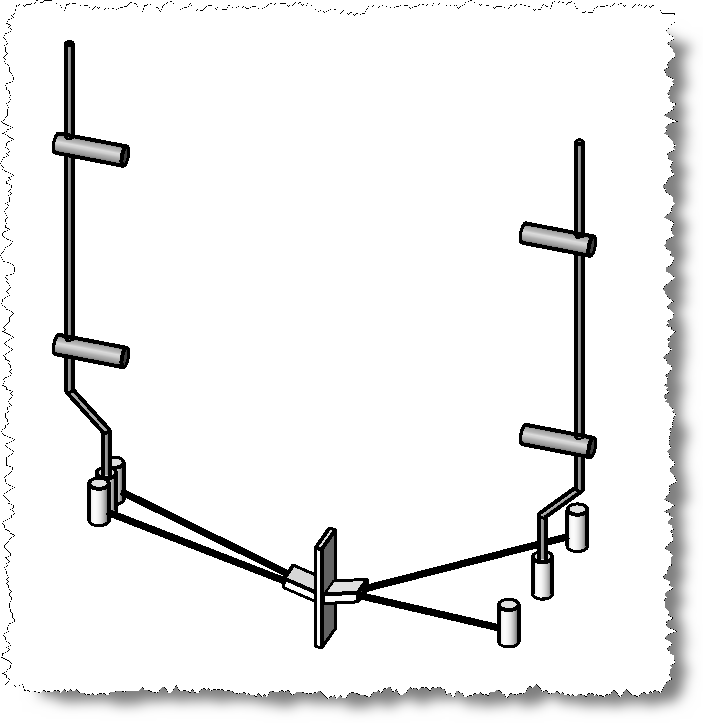
Now, we’re ready to make the Tension Step family. Create an extrusion for the central support plate. Now add a vee shaped extrusion for the 2 tension rods on each side. Model 2 tension rods each side, using a sweep. The geometry of this design can vary to suit your custom design of course. The design isn’t the point of this exercise. Add 6 extruded cylinders – 3 each side, with the outer cylinders connected to the tension rod sweeps. Now import the baluster family and position a baluster at each side on the centre reference plane.
Your Tension Step is complete.
Load the Tension Step into your Stair Project.
In the Stair Project, select Railing from the design Bar tab and then select Railing Properties.. Select the type 900 mm and Edit- Duplicate - Rename to I_Beam. Under the Railing Properties, change the name to I Beam , offset 0 and select the I Beam profile we created in step 6. In the Baluster dialogue, set all baluster families to none for main patter and posts and check the box for placing a baluster at each tread – 1 per tread, selecting the Tension Step as the family for this. Close the railing dialogue.
Set the Host as the stair and sketch the railing ( I Beam ) at the centre of the stair.
Finish sketch.
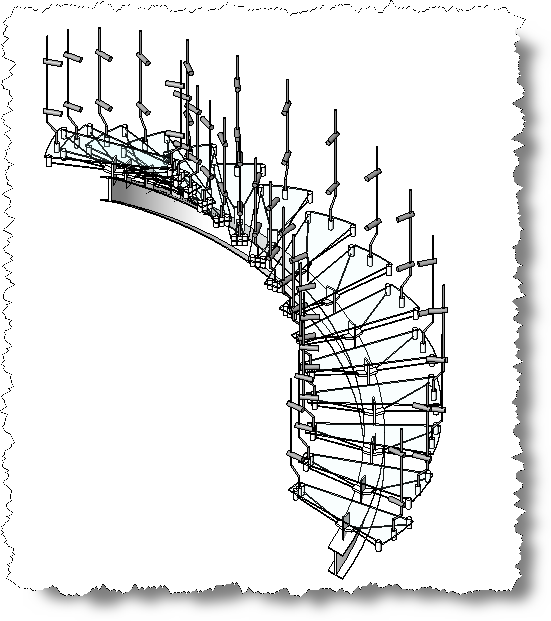
You stair should now look like this. ( Note you may need to use the railing flip arrows to get the correct setup ) Almost there !
And did you know
Your stairway lies on the whispering wind.
Sorry, got carried away there...
We need some curved glass panels to attach to our balustrades. ( No expense spared for this stair ! )
Firstly, we need to make a glass infill panel profile. Open a Profile Family template and create a 300 mm high x 6 mm thick rectangular profile. Save as Glass Infill profile and load this into your project.

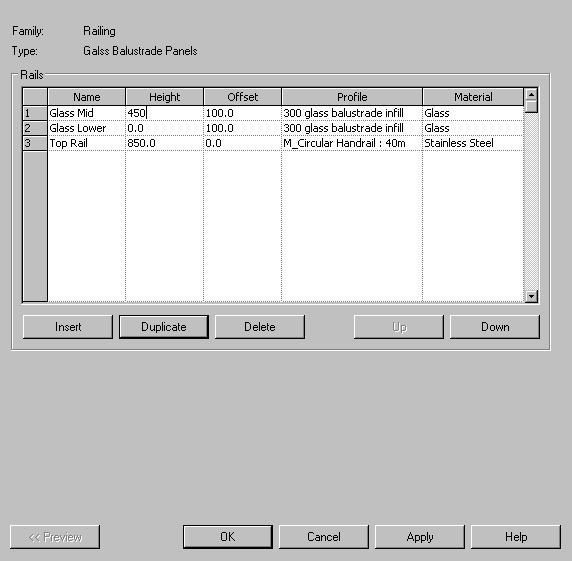
Select the railing tool again and Edit, Duplicate Rename as Glass Balustrade Panels. In the Rail structure properties, make the top rail profile Circular 40 mm diameter Height 850 mm Offset 0 – Material Stainless Steel. Now create a glass panel, Height 0 Offset –100 and profile Glass Infill Panel, Material Glass and set the baluster dialogue to None.. Repeat process for a second glass panel Height 450 mm. ( Tip – Duplicate the railing you just made, rename and change height )
Sketch the railing along the inner edge of your stair. Finish sketch. Check to see that all the locations and offsets are working the way you expect.
Your custom stair is finished.
And as we wind on down the road
Our shadows taller than our soul.
There walks a lady we all know
Who shines white light and wants to show
How ev'rything still turns to gold.
And if you listen very hard
The tune will come to you at last.
When all are one and one is all
To be a rock and not to roll.
All together now - " And we're building a Stairway to Heaven. "
Now, just be careful not to play it backwards.!
Footnote:
The inspiration for this article and the concept for "misusing " the stair railing tool to create the geometry belong to Autodesk Revit's Phi Read ( The Stair Meister ).
Oh and the lyrics belong to Robert Plant.

3 comments:
Bruce,
I was inspired by the way you did your stair so I tried my own & it worked very well. Only problem is how do you finish off the stringer at ground level? Do you just use the floor slab to hide it?
Thanks for the great tip!
Kin
Hello Bruce, i too am very impressed with your great knowledge of Revit. I understood most of this tutorial however if you could get a chance i was wondering if you would be able to explain in more detail about how to make the baulusters and performing the sweeps. I've been practicing Revit for about 3 months now at my high school and i am trying to learn as much as a i can so any help would be greatly appreciated.
Hi James,
When I get some time, I'll respond. At present, I'm heavily commited to writing a book - so it may not be for a while...
Post a Comment